
在本文中,我們將探討 docs 佈局,其可用來編寫項目文檔,個人筆記等。
If you’re going to use
docslayout on other sections(notes), please take a look at Content page.
佈局
docs 佈局由三部分組成,由左到右依次為:文檔導航欄、文檔內容和側邊欄。
內容結構
 1$ tree content/docs
 2├── _index.md
 3├── installation
 4│   ├── _index.md
 5│   ├── linux
 6│   │   ├── _index.md
 7│   │   ├── archlinux
 8│   │   │   └── index.md
 9│   │   └── ubuntu
10│   │       └── index.md
11│   └── windows
12│       └── index.md
13└── introduction
14    └── index.md
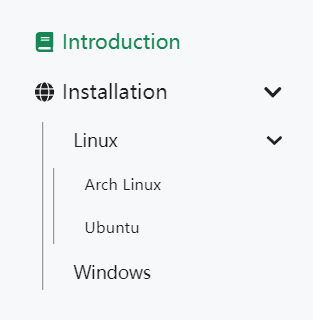
如圖所示,本例展示瞭如何組織一個多層次的文檔導航。
- 包含
_index.md將作為一個 Section。 - 包含
index.md將作為一個頁面。
文檔導航欄
標題
一般地,title 將作為默認標題顯示,但有時候過長的標題而顯得畫蛇添足,此時我們可以通過設置 linkTitle 以修改導航所顯示的鏈接文本。
1linkTitle = 'Windows'
2title = 'Install on Windows'
1linkTitle: Windows
2title: Install on Windows
1{
2   "linkTitle": "Windows",
3   "title": "Install on Windows"
4}
圖標
除此之外,我們提供一個名為 linkTitleIcon 的參數以設置標題左側的圖標。
1linkTitleIcon = '<i class="fas fa-columns fa-fw"></i>'
1linkTitleIcon: <i class="fas fa-columns fa-fw"></i>
1{
2   "linkTitleIcon": "\u003ci class=\"fas fa-columns fa-fw\"\u003e\u003c/i\u003e"
3}
權重與排序
我們根據 navWeight 參數對文檔進行排序,值越高則優先度越高。而對於沒有指定 navWeight 的文檔,則按照 title 進行字母升序排序。
1navWeight = 1000
1navWeight: 1000
1{
2   "navWeight": 1000
3}
外部鏈接
有時候我們將文章需要鏈接到外部站點,此時 redirect 可以派上用場,其將自動跳轉到指定的外部鏈接。
1redirect = 'https://github.com/razonyang/hugo-theme-bootstrap-skeleton'
1redirect: https://github.com/razonyang/hugo-theme-bootstrap-skeleton
1{
2   "redirect": "https://github.com/razonyang/hugo-theme-bootstrap-skeleton"
3}
側邊欄
小部件
側邊欄默認只包含內容目錄,但你可以通過鉤子添加小部件。
1{{- partial "docs/repo" . }}
2{{- partial "sidebar/recent-posts" . }}
評論